Tech Tips
Turning Raw Data into Insights - How to Organise Your Measures in Power BI
In this post, we’ll explore different ways to organise measures in Power BI so your data model stays tidy and your brain stays sane


One of the most powerful features of Power BI is the ability to create measures - calculations that turn raw data into key insights. As your report grows in complexity, so does your list of measures. Without a clear structure, even the best built models can quickly become cluttered.
In this post, we’ll explore different ways to organise measures in Power BI so your data model stays tidy and your brain stays sane. Your future self and your colleagues will thank you! You can read more generally about the Business Intelligence Roadmap here.
Organisation in model design isn’t simply about keeping things neat, it also brings significant benefits such as…
- Clarity and easier collaboration - You, your colleagues and your client can more easily understand and navigate the model. Whether it’s handing over, pair programming, or walking someone through the model you designed, a clear structure helps others follow your logic.
- Saves time - Quickly locate existing measures and avoid duplicating calculations because the originals were hard to find.
- Easier bug detection - Spot logic issues, circular references in measures or unintended measure dependencies.
- Reusability and efficiency - Building on top of core measures will reduce redundancy and make your model more efficient.
- Supports scalability - A well-structured model is easier to grow, maintain and adapt.
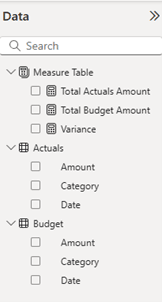
Option 1: A Dedicated Measure Table
A dedicated measure table is an unlinked, dummy table used to store measures. These can be grouped using display folders. There is no data in this table, just calculations.
How to Create a Dedicated Measure Table:
- Go to the Home tab and select ‘Enter data’ to create a new table.
- Add a placeholder value and name the table.
- Right-click the column and select ‘Hide in report view’.
- Add your measures to this table
- To use display folders, go to the Model view and select a measure. In the Properties pane, enter a folder name in the Display folder field.
Pros:
- Centralised location - All the measures are in one place, so they are easy to locate.
- Works well for cross-table calculations - Some measures don’t fit naturally in a specific fact or dimension table; this gives them a home.
Cons:
- Measures lose their context - It’s harder to quickly see which columns and tables a measure relates to when it’s not stored within its parent table. Users must rely on naming conventions, display folders or documentation to find a measure’s origin.
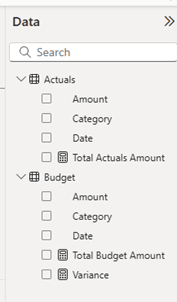
Option 2: Store Measures in the Parent Table
Measures are stored directly in the table they’re most closely related to, e.g. Budget Amount = SUM(‘Budget’[Amount]) is placed in the Budget table. You could then use display folders to organise the measures logically within that table. Often, the fact table’s columns are hidden, leaving only the measures visible to keep the model tidy for report users.
Pros:
- Improved context clarity - Measures live next to the data that they relate to or calculate, which makes it easier for users to understand the measure. This also means less reliance on documentation and naming conventions.
- Easier DAX writing and IntelliSense - When writing DAX, columns from the same table can be referenced without the table’s name and IntelliSense suggestions are based on that table.
Cons:
- Measures are Scattered Across Tables - Measures are spread out across the model so it’s harder to get an overview of all the calculations.
- Homeless measures - Cross-table measures or general-purpose calculations may feel out of place when forced into a specific table that doesn’t fully represent their logic.
What to do with homeless measures?
There will always be some measures that don’t naturally belong to a single table. These can include things like formatting logic, dynamic values, conditional formatting logic or calculations that use data from multiple tables.
- Display folders - group them under logical categories, e.g. “Formatting”, “Global logic”.
- Place them in the most relevant table - use a consistent rule, e.g. store formatting measures with the table that they affect the most.
- Consider calculation groups and visual-level calculations - Calculation groups can be used for dynamic calculations, reusable time intelligence and conditional formatting. Visual-level calculations can be used for conditional formatting, sorting and ranking, one-off calculations, debugging and validating measures.
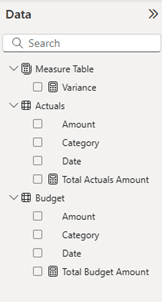
Option 3: Hybrid
A hybrid approach could give you the best of both worlds. Store table-specific measures in their parent tables and use a dedicated measures table for the homeless measures.
5 Best Practices for Organising Measures
- Be consistent - Choose a method and stick to it across your model.
- Name clearly - Avoid names like Measure1 and use meaningful language.
- Label your DAX - Use ‘- -‘ or ‘ /* */’ to explain your logic.
- Minimise duplication – Build base measures and reuse them in complex measures, e.g. [Budget Amount] used in [YTD Budget].
- Hide what’s not needed - Keep the model clean for end-users. Hide things like intermediate measures, helper columns or unused fields.
Summary
There’s no single “correct” option to organise measures in Power BI. The right approach will depend on:
- The model’s size, structure and complexity.
- How your team works.
- How often measures are reused or modified.
- Preference for clarity or for centralisation.
The most important thing is that your approach is consistent, easy to understand and maintainable – then you can rest assured that you’ve made things better for everyone.
PA
Phoebe Arrowsmith
Graduate BI Developer


Frequently Asked Questions
Couldn’t find the answer you were looking for? Feel free to reach out to us! Our team of experts is here to help.
Contact Us