Blog Post
Working with Tables in Microsoft Word - Part 1

Microsoft Word Tables
Microsoft Word offers a very powerful table feature, but it can be a bit of an art working with tables sometimes. In a series of blogs I aim to run through some simple, but essential tasks when working with tables in Word.
It is easy enough to copy and paste a data set into Word from a source such as a Microsfot Excel workbook as a lot of default formats are applied when the data is pasted, but formatting it to your requirements is then often the challenge.
In Working with Tables in Microsoft Word - Part 1 we will look at:
Excel Workbook to Word Table
Here is an example of data from an Excel workbook that is simply pasted (CTRL-V) into a Word document:
If we paste this selected range into word using a standard paste (CTRL-V) then a default table will be created for us:
You can see that we get the column headers highlighted as a table header row, and a separate column created for each column copied from the Excel workbook. We have default column widths which has resulted in some wrap arounds, and we have default border styles with a thin line.
We could start with this default layout and modify it or we could paste the data in as simple text and then create the table from scratch. If you right click in the location you wish to paste the data into you will see the following pop up menu – the last paste option labelled with an A is the simple text paste:
Here is how the data would look if we pasted it just as text:
Converting Text to a Table
As we have simply pasted text into Word we now need to convert this text into a table. This can be done via the Insert ribbon. The Convert Text to Table option in the Table drop down enables us to specify row and field delimiters to convert the plain text to a table. Select the text to be converted and then choose the Convert Text to Table option:
The following dialog will be displayed:
You can see that Word has detected that the selected text has tabs between each field and has, therefore, deduced that there will be 6 columns required in the table. The row delimiter is taken to be a new line and Word has recognised 831 rows (there were 830 data rows and a header row pasted from the Excel workbook).
Here is the resulting table:
Formatting a Word Table
Regardless of which method you choose to create your table you can format it via the Table Design ribbon, accessible via the Table Tools context tab:
Table Tools Design Tab
Word Table Styles
There are some short cut options to format your table by selecting one of the predefined styles in the Table Styles section of the ribbon. Alternatively you can manually format the table. The predefined Table Styles can be customised using the tick boxes on the left hand side of the ribbon.
On the left of the Table design ribbon you can see options to:
- Indicate that there is a column headings row (Header Row tick box)
- Indicate that there is a row heading column (First Column tick box)
- Add a total row (Total Row tick box)
- Add a total column (Last Column tick box)
- Select banded rows or banded columns
You will see that as you tick or untick these boxes the Table Styles icons change to refelct your choices. In the following example we have selected row headings, banded rows and a total row, but deselected First Column.
You can see that the table styles are different to the default ones we saw when we first converted the text to a table (compare with the earlier screen shot).
We will now choose the 7th table style (Plain Table 5) and here is the result:
Once you have created the basic layout for your table you can customise it manually. On the right of the Table design ribbon you can see options to:
- change the shading of rows and columns
- change the border styles for the table
- change line widths and styles
Customising Word Tables
Table Tool Layout Tab
We can customise many elements of our table through the Table Layout ribbon:
Repeating Row Headings Across Pages
Our table currently has a row of column headings (a header row), but this is not repeated as we page through the document, as shown by the screen shot below of a multipage view of our table:
On the far right hand side of the Layout ribbon is an option “Repeat Header Rows”. This option will be greyed out until a row (or rows) from the table is selected. The following screen shot shows that we have selected the headings row, and the option has become available:
Clicking on the Repeat Header Rows option enables the option. You can see the multipage view below now shows the column headings (the headings row) being repeated on every page:
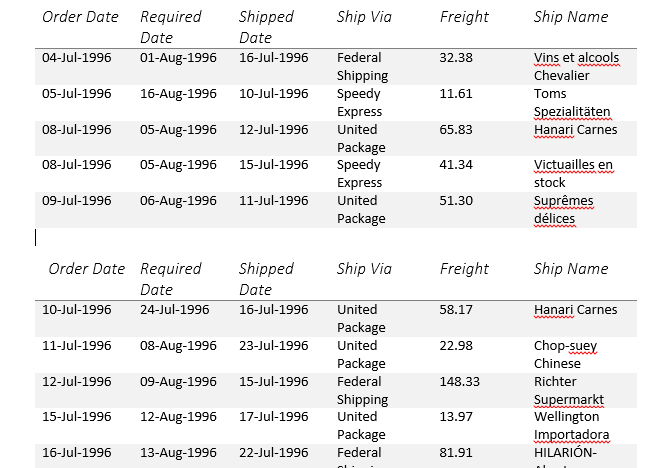
Splitting Word Tables
Sometimes we may wish to split a single table into several smaller tables. We can achieve this via the Table Tools Layout ribbon. There is a Split Table option in the Merge section of the ribbon:
Click in the row that you wish to split the table at and then click on the Split Table option. In this example the cursor is positioned in the row for 10-Jul-1996, here is the result:
As you can see the table has been split correclty, but the column headings have not been included in the newly created table.
To finish the job you will need to copy the header row from the first table and insert it into the second one. To achieve this select the header row and copy it to the clipboard. Now right click on the first row of the second table. A paste menu will appear:
Choose the second option (Merge Table). Your second table will now look as follows:
I hope you have found this useful. Keep an eye out for Part 2 on our blog page.
If you would like to learn more about Microsoft Word take a look at our Word Training Courses.
MD
Mandy Doward
Managing Director
PTR’s owner and Managing Director is a Microsoft certified Business Intelligence (BI) Consultant, with over 35 years of experience working with data analytics and BI.


Frequently Asked Questions
Couldn’t find the answer you were looking for? Feel free to reach out to us! Our team of experts is here to help.
Contact Us