Blog Post
Starting to play with Excel VBA

Introduction to Excel VBA Part 1
This article is aimed at users who have a basic knowledge of Excel VBA.
Microsoft Excel is a very powerful application, allowing us to add, manipulate, analyse and report on data with ease. However at times we all wish tasks could be completed that little bit quicker. That’s where VBA comes in, writing a few lines of code can be the difference between a task taking 2 minutes or 2 hours.
[Selecting a Cell](#Selecting a Cell)[Selecting a Range of Cells](#Selecting a Range of Cells)[Adding Data to a Cell](#Adding Data to a Cell)[Formatting Data](#Formatting Data)
Below are just a few lines to help introduce you to VBA.
Selecting a Cell
Sub SelectCell()
Range("A1").Select End Sub
(Picture 1)
Selecting a Range of Cells
Sub SelectCellRange()
Range("A1:C5").Select End Sub
(Picture 2)
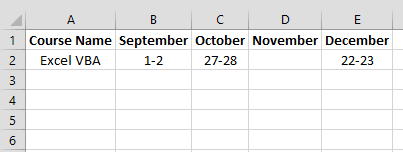
Adding Data to a Cell
Sub AddData()
Range("A1") = "Course Name" Range("B1") = "September" Range("C1") = "October" Range("D1") = "November" Range("E1") = "December" Range("A2") = "Excel VBA" Range("B2") = "1-2" Range("C2") = "27-28" Range("D2") = "" Range("E2") = "22-23"
End Sub
(Picture 3)
You can see that the data has been added, but could do with some formatting, so I have added a few lines of formatting code on to the end below.
Formatting Data
Sub AddDataWithFormatting()
Range("A1") = "Course Name" Range("B1") = "September" Range("C1") = "October" Range("D1") = "November" Range("E1") = "December" Range("A2") = "Excel VBA" Range("B2") = "1-2" Range("C2") = "27-28" Range("D2") = "" Range("E2") = "22-23" Range("A1:E1").Font.Bold = True With Columns("A:E") .AutoFit .HorizontalAlignment = xlCenter End With
End Sub
(Picture 4)
You can see that the code above has made the heading row bold, and autofitted & Centralised columns A to E.
If you would like to learn more about Microsoft Excel VBA, keep an eye out for Part 2, and take a look at our Excel VBA Training Courses.
IR
Ian Roberts
Technical Director
Ian is an incredibly talented solutions architect. He has over 15 years of experience working with data, as part of a broader IT career spanning over 20 years.


Frequently Asked Questions
Couldn’t find the answer you were looking for? Feel free to reach out to us! Our team of experts is here to help.
Contact Us