Blog Post
Working with Tables in Microsoft Word - Part 2

Microsoft Word Tables
Welcome to Part 2 of Working with Tables in Microsoft Word. (If you missed Part 1, click here)
In Working with Tables in Microsoft Word - Part 2 we will look at:
- [Merging & Splitting Cells](#Merging & Splitting Cells)
- [Adding Rows & Columns](#Adding Rows & Cloumns)
- [Text Alignment & Direction](#Text Alignment & Direction)
- [Using AutoFit](#Using Autofit)
Merging & Splitting Cells
Merging Cells
One of the options you have when working with tables, is to merge cells. This is very beneficial, as it allows you to group columns or rows under the same heading. The tables below show cells before and after they have been merged.
Before:
(Picture 1)
To merge table cells, select the cells you want to merge, then select the Merge Cells Command, found in the Table Tools Contextual Layout Tab.
(Picture 2)
After:
(Picture 3)
Splitting Cells
As well as merging cells together, you can also split them up. You may be faced with the above picture 3, but require data presented as picture 1. To split cells, firstly select the cell you wish to split, then select the Split Cells Command, found in the Table Tools Contextual Layout Tab. You will be presented with the below window.
(Picture 4)
At this point you need to decide how you would like to split the cell, how many rows and columns, and then select ok.
Adding Rows & Columns
Microsoft Word allows you to add rows and columns to your table in a variety of different ways.
Firstly, place the curser the cell within your table where you would like to add the new row or column, then select the Table Tools Contextual Layout Tab, and choose either the Insert Above, Insert Below, Insert Left or Insert Right command. (Pictured Below)
(Picture 5)
The picture below shows a new added row.
(Picture 6)
You can also make use of the quick adding feature of Word tables. Hover over the top row, or far left column where you would like to add your new row or column, a small plus sign will appear, select it, and the new row or column will be added.
(Picture 7)
Text Alignment & Direction
Text Alignment
Microsoft Word allows you to adjust the alignment of your text within each cell of your table. If you want all of your cell alignments the same, select your table, navigate to the Table Tools Layout Tab, and select the alignment you would like. There is an example below of the different layout options.
(Picture 8)
Sometimes you will want different cells to have different alignments, for example having the first column aligned left, and all others centrally aligned. To have multiple alignemts, select the cell, or cells you want to align, and choose the layout option you require.
Text Direction
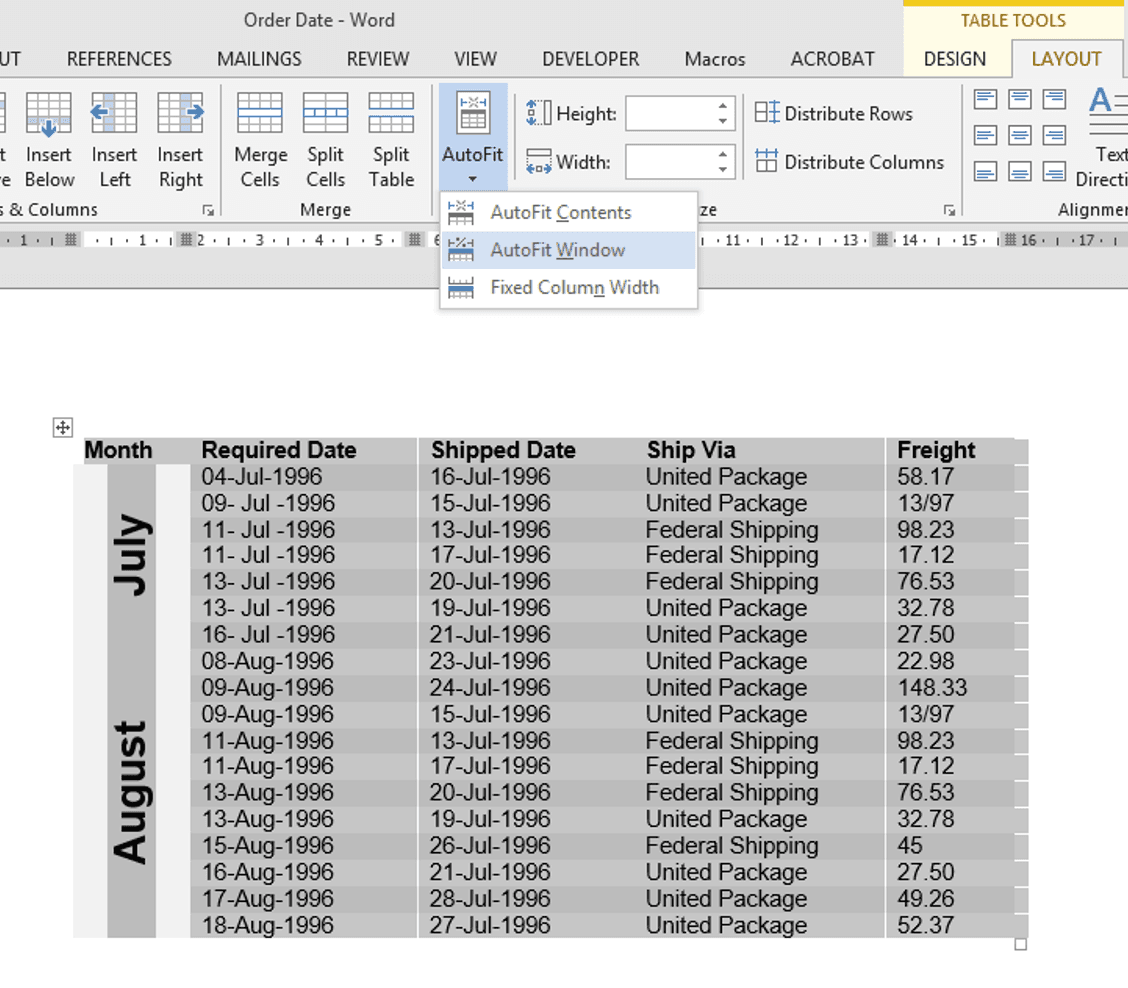
Microsoft Word also gives you the option of changing the direction of your text. This can be really affective when creating tables such as the one pictured below. The headings in the left column, July and August, have had the text direction changed, and been centrally aligned.
(Picture 9)
To change the text direction of your table cells, select the cell, or cells you want to change, navigate to the Table Tools Layout Tab, and select the Text Direction Command, until the text is running in the direction you require.
Using Autofit
Microsoft Word has a feature that allows you to automatically adjust your table column widths, based on the length of the longest text string in each column. Select your table, navigate to the Table Tools Layout Tab, and select the Autofit drop down, and choose Autofit Contents. As pictured below.
(Picture 10)
You can also autofit your table to the document window, by selecting the table navigating to the Table Tools Layout Tab, selecting the Autofit drop down, and choosing Autofit Window. As pictured below.
(Picture11)
If you would like to learn more about Microsoft Word take a look at our Word Training Courses.
IR
Ian Roberts
Technical Director
Ian is an incredibly talented solutions architect. He has over 15 years of experience working with data, as part of a broader IT career spanning over 20 years.


Frequently Asked Questions
Couldn’t find the answer you were looking for? Feel free to reach out to us! Our team of experts is here to help.
Contact Us